
Okay, so you're brand new to wire wrapping, but decided to give an intermediate to advanced project, a go anyway... awesome! Here are some quick tips that might help you get your impulse started off on the right and enjoyable foot.
1. Handling long lengths of thin wire (potentially up to 6 feet at a time)
- Don't learn using sterling silver or gold. Get copper or craft wire in 28 or 30 gauge. It feels as thin as thread, but can't be handled that way. The more the wire is 'pulled' like a thread, through other wires, the thinner and more brittle it becomes. This will quickly cause kinking and breaking. It's a gentle feeding of the thin wires, through tight spots that works best for me.
- I lay the 'long end' of the wrapping wire, out over my lap, draping down the side of my chair. I handle the 'wrapping' end, in a way akin to 'knitting' and as I work, I allow the length to work up from my side.
- Some folks 'loosely coil' the longer end, unraveling lengths as they wire wrap. Find what works best for you. The objective is to manage the thin wire so that it doesn't kink, break, knot, etc... as you work.
- Why is it so long? Most of the time, it's not and you can hide cut ends, but the reason I work with longer lengths is to minimize the tiny cut ends. If making a ring shank, for example, you don't want a bunch of cut ends on the inside of the shank, next to the skin, because they have the potential to 'scratch' or poke the wearer. Leaving cut ends on the outside, unfortunately, leaves potential for catching on clothing. Be mindful of where you cut, if you need to cut and continue wrapping the tiny wires.

2. Gotta make a tight spiral?


5. Size your wire properly
Wire is sized in Gauges. The lower the number, the larger the diameter of the wire. So... 10 gauge wire is large and hard, while 30 gauge wire, is as thin as a hair. Here is a useful link...
http://www.Wire-Sculpture.com (sighs with affection... it's where I first learned). xo

6. Tensile Strength / Wire Hardness
Wire comes in different 'hardness' or tensile strength ... Dead Soft, Half Hard and Hard. Most wire wrapping projects use Dead Soft wires. The wires harden as you work with them and Dead Soft wires are pliable, easy to bend and manipulate into shape. Hard and Half hard wires are great for 'utility' pieces such as jump rings, earring hooks and clasps that need to hold their shape under use or pressure.
Wire hardness, varies also, depending on the metal. Sterling silver might feel different at Dead Soft than Brass.
7. Wire comes in different shapes.
Round, Half Round, Square and imprinted with design. Choose the appropriate wire for your project and combine wire types to add texture to a project.
8. Do you need to soften your thick, hard wire?
Don't be afraid to use fire. If you don't want to get a micro torch (hand held torch), then you can also use an open flame from your stove top (if you have one and if the wire is 20 gauge or thinner)... glass coil burners won't work to apply enough heat to the metal. A decent micro torch can be found at your local craft / hobby store or local hardware store. They are fueled by Butane (lighter fluid, available at any local grocery, hardware or drug store). Use care, use pliers and run the fire over the wire until you detect a color change (few seconds)... make sure to use pliers to pick the wires up and put into a water bowl for cooling down. BE CAREFUL and learn more about heating up wire before you jump in... there's a lot to it, for safety and I don't cover it here. An added process if you use fire, will be removing the firescale from the wire (the burn), just FYI.
9. A bit of 'extra' you say?
Got a lot of 'scraps' because you're new to wire wrapping and added length to wire projects? Yes, we've all done it and still do it... no worries! You're a wire wrapper now... use the 2+ inch 'scraps' and make your own findings. What are earring hooks but wires anyway! Bracelet clasps, jump rings, head pins... all can be made with scraps of wire 2 to 6 inches long. Do't throw it away. Google up or check my Pinterest for free jewelry findings tutorials.
10. Do you need to harden wire?
Dead soft wires, during wrapping, will harden naturally. It might not be enough however, to keep that decorative spiral on the front of the stone in place.. so sometimes, we need to harden the wires. Wires can be hardened by hammer or by tumbler. If you made earring hooks, but used dead soft wire 'scraps', then you can harden that wire by hammering it with a ball peen jewelry hammer. This also gives the wire texture. Some folks toss their finished jewelry into a Tumbler (machine) to harden and polish wires after the wrapping is complete. I don't use a Tumbler, but you can if you like. I don't cover Tumblers... but they come with instructions. ;)
- Use your round nose pliers to create the first one or two loops into your spiral, then use flat nose pliers to finish it up. Using the flat nose to handle your wire, rather than the round nose, helps to prevent 'pits' along your wire.
3. Gotta thread tiny beads onto thin wire?
You can try to pick the bead up, position the hole into your wire... OR ... you can do it the easier way and lay your tiny beads out onto some felt, then use the end of the tiny wire as a needle and pick the beads up from the felt.
4. Your wires came off the spool 'warped' and with some kinks...
- If you're going to work with wire and create wire wrapped jewelry, along with your basic tool set, you might include a pair of Nylon Jaw pliers. They can be purchased from any local craft store. You can straighten wires with your fingers if they're thin enough, but the thicker wires are harder to get straight. Starting with straight wires can make a big difference to the quality of your finished work.
- Hold your wire with regular pliers in one hand and use the Nylon Jaw pliers to run down the length, giving good pressure on the wire (you don't have to strangle it) but one or two 'rubs' along the length with your Nylon Jaws will get the warps out.
- Not only will your finished jewelry look better, but in the long run, this extra step will actually make it easier for you to wrap and weave the wires together. It's hard to do this if the wires are warped and have irregular gaps down their length.
5. Size your wire properly
Wire is sized in Gauges. The lower the number, the larger the diameter of the wire. So... 10 gauge wire is large and hard, while 30 gauge wire, is as thin as a hair. Here is a useful link...
http://www.Wire-Sculpture.com (sighs with affection... it's where I first learned). xo
6. Tensile Strength / Wire Hardness
Wire comes in different 'hardness' or tensile strength ... Dead Soft, Half Hard and Hard. Most wire wrapping projects use Dead Soft wires. The wires harden as you work with them and Dead Soft wires are pliable, easy to bend and manipulate into shape. Hard and Half hard wires are great for 'utility' pieces such as jump rings, earring hooks and clasps that need to hold their shape under use or pressure.
Wire hardness, varies also, depending on the metal. Sterling silver might feel different at Dead Soft than Brass.
7. Wire comes in different shapes.
Round, Half Round, Square and imprinted with design. Choose the appropriate wire for your project and combine wire types to add texture to a project.
8. Do you need to soften your thick, hard wire?
Don't be afraid to use fire. If you don't want to get a micro torch (hand held torch), then you can also use an open flame from your stove top (if you have one and if the wire is 20 gauge or thinner)... glass coil burners won't work to apply enough heat to the metal. A decent micro torch can be found at your local craft / hobby store or local hardware store. They are fueled by Butane (lighter fluid, available at any local grocery, hardware or drug store). Use care, use pliers and run the fire over the wire until you detect a color change (few seconds)... make sure to use pliers to pick the wires up and put into a water bowl for cooling down. BE CAREFUL and learn more about heating up wire before you jump in... there's a lot to it, for safety and I don't cover it here. An added process if you use fire, will be removing the firescale from the wire (the burn), just FYI.
9. A bit of 'extra' you say?
Got a lot of 'scraps' because you're new to wire wrapping and added length to wire projects? Yes, we've all done it and still do it... no worries! You're a wire wrapper now... use the 2+ inch 'scraps' and make your own findings. What are earring hooks but wires anyway! Bracelet clasps, jump rings, head pins... all can be made with scraps of wire 2 to 6 inches long. Do't throw it away. Google up or check my Pinterest for free jewelry findings tutorials.
10. Do you need to harden wire?
Dead soft wires, during wrapping, will harden naturally. It might not be enough however, to keep that decorative spiral on the front of the stone in place.. so sometimes, we need to harden the wires. Wires can be hardened by hammer or by tumbler. If you made earring hooks, but used dead soft wire 'scraps', then you can harden that wire by hammering it with a ball peen jewelry hammer. This also gives the wire texture. Some folks toss their finished jewelry into a Tumbler (machine) to harden and polish wires after the wrapping is complete. I don't use a Tumbler, but you can if you like. I don't cover Tumblers... but they come with instructions. ;)
I will be adding to this post as I go and as things and questions come up, so be sure to bookmark this page and visit again soon!
Enjoy your wire wrapping!
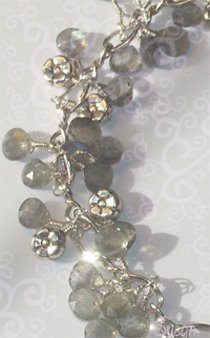
and when you're ready... I hope you visit my store for some really fab wire wrapped jewelry tutorials. ;)
https://www.etsy.com/shop/PerfectlyTwisted
and when you're ready... I hope you visit my store for some really fab wire wrapped jewelry tutorials. ;)
https://www.etsy.com/shop/PerfectlyTwisted
Some additional things before you start... you might be interested to read the next post...
http://perfectlytwistedjewelry.blogspot.com/2014/05/getting-started-before-you-get-started.html
and also, I have several free tutorials throughout my blog... please check the archives and have fun!
http://perfectlytwistedjewelry.blogspot.com/2014/05/getting-started-before-you-get-started.html
and also, I have several free tutorials throughout my blog... please check the archives and have fun!


.JPG)
-002.JPG)


No comments:
Post a Comment